Live, Laugh, Localtalk with Basilisk II
Feb 10, 2025
[ #basilisk #localtalk #appletalk #macintosh #macplus #system7 #retrocomputing ]
Contents
As I mentioned in my Enhancing my Macintosh 512Ke post, I use the Basilisk II Macintosh 68k emulator alongside my Macintosh Plus to facilitate downloading software, sharing files with AppleShare, playing Myst and many other things. It does take a bit of setup to get working though, especially with configuring the network to work with AppleTalk.
Below is a short guide on how I installed and setup Basilisk II on my Linux Mint laptop to work with my Macintosh Plus over the network.
Installing Basilisk II
Basilisk II is available in the main Ubuntu, Linux Mint and Debian repos and I assume other Linux distros probably have it too. There are other Macintosh emulators out there like SheepShaver, Mini vMac and even the entirely online Infinite Mac but I like Basilisk since it provides a nice settings manager and works well.
It is quickly installed with apt on a Debian based distro,
sudo apt update
sudo apt install -y basilisk2
Setting Up Basilisk
Basilisk requires a few things to setup, most notable a system ROM and disk image. It also can mount a shared folder with the host called unix that makes copying files in/out of the VM relatively easy.
Start by creating directories for ROMs, disks and file sharing,
mkdir -p ~/Documents/basilisk
cd ~/Documents/
mkdir roms unix disks
Find and copy a ROM file into ~/Documents/basilisk/roms, for my setup I use PERFORMA.ROM for no particular reason.
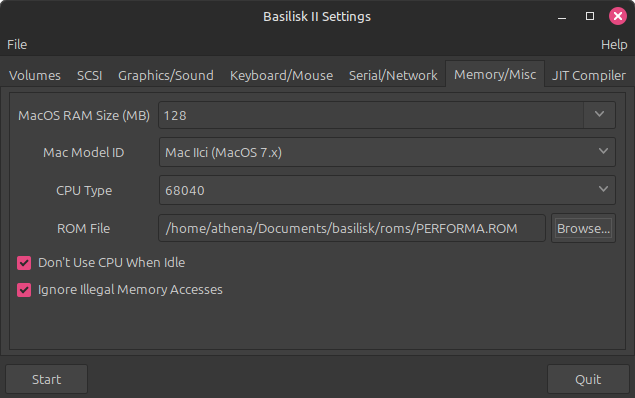
In the Memory/Misc tab, configure the machine with the following,
- MacOS RAM Size (MB): 128 (or higher)
- Mac Model ID: Mac IIci (MacOS 7.X)
- CPU Type: 68040
- ROM File:
~/Documents/basilisk/roms/PERFORMA.ROM
A full Install of System 7.5.5 is required in order to use AppleShare and do anything really useful. Disk images are available various places online or you can follow a guide to make your own, which is what I did.
Using Basilisk
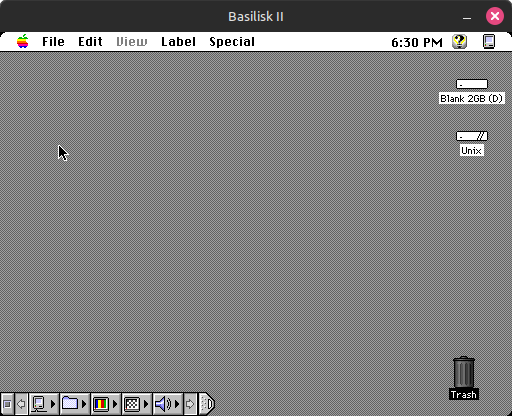
With system configuration complete and a 7.5.5 disk image ready, turn on the VM which will load a default desktop containing few icons like the disk drive and trash.
Wireless LocalTalk
Getting AppleTalk to work on a 7.5.5 in Basilisk and communicate with other Macintosh devices over LocalTalk using the hosts wireless networking requires a custom kernel module call sheep_net.
The module is available in the macemu repository and must be built your system and kernel version. This also means that every time there is a kernel upgrade, you will need to re-build the module.
To build the kernel module,
git clone https://github.com/cebix/macemu.git
cd macemu/BasiliskII/src/Unix/Linux/NetDriver
make
sudo make install
Load the sheep_net kernel module and update it’s permissions so users other than root can use it. This must also be done on every reboot and I have on my to-do list to write a script and add it to something like rc.local so it loads with the correct permissions across reboots.
sudo modprobe sheep_net
sudo chmod 777 /dev/sheep_net
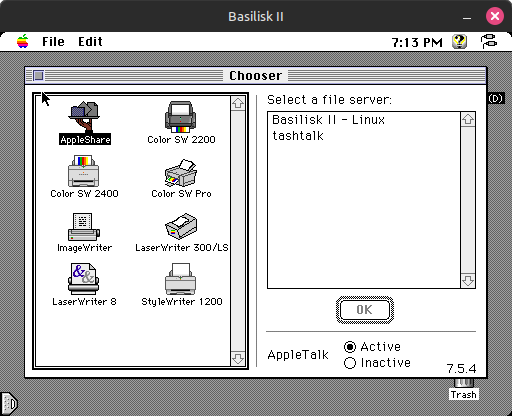
Finally, in the Serial/Network tab of Basilisk, change the Ethernet Interface to your wireless or wired Ethernet device that’s connected to your LAN.

After starting the VM will see other devices using AppleTalk on your local network, and if you have a TashTalk and TashRouter, older LocalTalk devices like a Macintosh Plus are also available.
Conclusion
The biggest benefit I have from this setup is I can write blog posts in MacWrite on the Macintosh Plus completely distraction free and save them easily to a shared folder in Basilik on my laptop over wifi.
Previously I would save the file to a virtual floppy disk on the FloppyEMU or use the BlueSCSI Toolbox to export the file to the SD card. Saving directly to Basilisk and then copying the file to the laptop through the unix shared folder is faster and closer to the original way Macintosh file sharing worked.
This setup makes me appreciate how impressive that AppleTalk is as almost entirely zero-configuration. Just plug systems into the same physical (or wireless) network and they’re immediately available for use, even today there are very few products that can claim to do that.